You will find here some post-processing tips and tricks… In some cases, film filter techniques were simply transposed to post-processing!
I use Photoshop and Camera RAW which is very similar to Lightroom, but transposing these tips to other post-processing software should be relatively easy.
One more thing: when I post-process some parameter (saturation, contrast, color temperature, etc.), I stop when I find the modification OK, and then remove some 20% of it. Otherwise, when I come back to the image I find it overdone...
Local Contrast
To boost a somewhat hazy image, local contrast enhancement can be achieved with the standard Unsharp Mask Photoshop filter: low amount, large radius, zero or very small threshold. Here are a few suggestions that you can adjust depending on your needs:
- Lighter: 10%, 20.0 pixels, 0 threshold (or small < 5),
- Stronger: 20%, 50.0 pixels, 0 threshold (or small < 5).
A classical sharpening technique remains necessary after resizing (high amount 90% to 300%, small radius 0.3 to 1.5 pixels and small threshold 1 to 8).
Roll your mouse over the crop of this 50 mm image to see the effect of such local contrast enhancement.
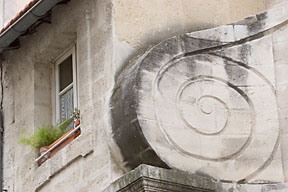
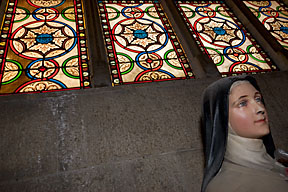
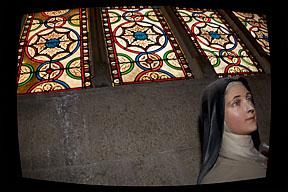
Cloudy days
It is often a good idea to warm up your cloudy day images, especially for architecture shots. In film times, we used warming filters. Under Photoshop, this is simulated by "Image >> Adjustments >> Photo Filter"; but, if possible, you're better off increasing color temperature under Photoshop Camera RAW.
This image has an auto white balance color temperature of 4650°K; roll your mouse over it to increase to 4950°K.
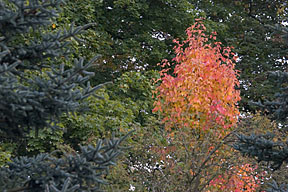
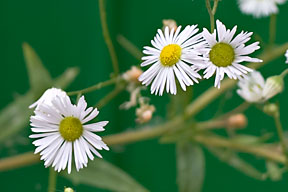
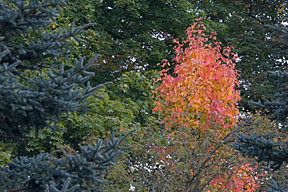
Fall colors
To reproduce the fall feeling more accurately, you may slightly decrease color temperature and slightly increase saturation.
This can be done on camera, or from JPEG files ("Image >> Adjustments >> Photo Filter" for color temperature adjustments), but I find it really more comfortable from Photoshop Camera RAW.
Roll your mouse over the image to see the effect of such an adjustment (from 4600°K to 4300°K and a saturation of +10).
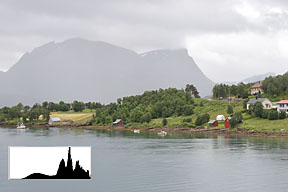
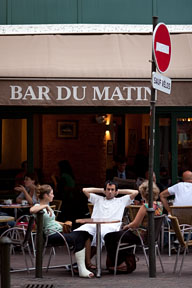
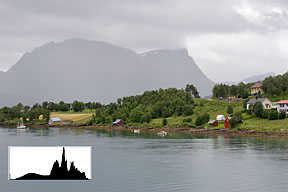
Adjusting exposure
Eye sensitivity is non linear as opposed to sensor sensitivity: higlights are coded with excess details that can be recovered by darkening in post-processing under Photoshop Camera RAW (Exposure, Shadows Brightness). On the other hand, increasing exposure under Photoshop Camera RAW and adjusting white-point under "Image >> Adjustments >> Levels" is to be limited as it quickly
posterizes your shadows.
Consequently, when shooting, you should really avoid under-exposure. On the other hand, a slight over-exposure (to the right of the histogram) is beneficial, as long as there is no unwanted highlight saturation and with adequate adjustments in your RAW converter. See this Adobe document for more details.
If you roll your mouse over this 50 mm 0.5 EV over-exposed image, you will see the result of Photoshop Camera RAW adjustments.
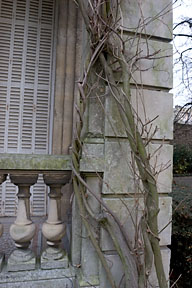
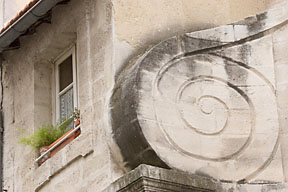
Lens distorsion
Some pictures containing straight lines don't put up too well with lens distorsion. This is especially true with
architecture shots. In such cases, I used LensFix for quite some time, a Photoshop plugin for the Mac (equivalent to
PT Lens on the PC); but now CS6 and all major photography softwares include distorsion correction.
It is also possible to calibrate lenses not present in the database. For that purpose, I created this target.
Rolling your mouse over this image taken at 17 mm on the EOS 20D, reveals the LensFixed version.
Fisheye and rectilinear
Rectilinear wide-angle lenses preserve straight lines: great for architecture shooting. Fisheyes preserve solid-angles: cercles are rendered homogeneously, and faces are less distorted. Unfortunately, it is mathematically impossible to have both characteristics when projecting on a plane...
When I (seldom) shoot faces with my wide-angle lens, I use Remap from the Kekus PanoTools for Macintosh (PTRemap for the PC) to change my rectilinear lens into a fisheye lens. Geometric distorsion can also now be manually adjusted with Photoshop lens correction filter.
Roll your mouse over this 17 mm image (EOS 20D crop factor: x 1.6) to see the fisheye remap impact on lines, cercles and faces. Cropping is then of course necessary to remove bent borders.
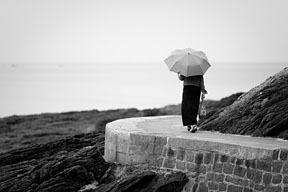
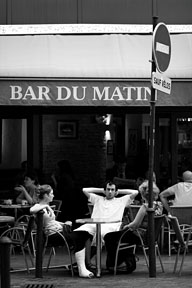
Black & White
It is worth converting an image to black & white when it has little hue variations, or when the color information is relatively useless or even detrimental to your message. This allows greater contrast control through post-processing, increasing tenfold your composition power. Using Photoshop Camera RAW or Lightroom, you can selectively adjust the level of grey associated with eight different colors (the old colored filters from film times), and then globally increase contrast with the curve tool well over what would be acceptable on a color image. Adding some slight
deliberate vignetting may help to further concentrate the onlooker's gaze towards the centre of your image.
Roll your mouse over the image for a black & white interpretation and click the link for some more examples.
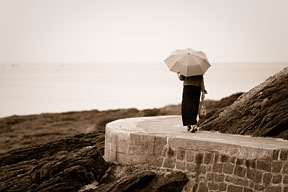
Split Toning
In some cases, color
split toning may further increase an atmosphere. Using Photoshop Camera RAW or Lightroom, the "Split Toning" tab will let you selectively adjust hue and saturation for highlights and shadows. I suggest starting with saturation sliders set to maximum for highlights and minimum for shadows allowing precise color selection for highlights, then similarly selecting the color for shadows and finally fine tuning both saturation sliders.
Roll your mouse on the image for a "Sepia" split toning.